
If part of a Blender mesh moves with the wrong bone, select one vertex at the peak of the error and inspect its Vertex Weights. Compare each listed vertex group with the same-named deform bone. An anatomically unrelated group is the likely cause.
Test that candidate on a copy before editing anything: rotate the bone, temporarily remove its weight from the bad vertex, and repeat the pose. If the unwanted movement disappears, you have isolated the influence instead of guessing with Smooth or another automatic bind.
The fastest manual check
-
Hold the pose that reveals the error
Rotate only the suspected part until the wrong movement is easy to see. Save a copy and record the frame. You need the same pose after every change.
-
Inspect the worst vertex
In Edit Mode, select one vertex at the peak of the bad deformation. Open the 3D Viewport Sidebar and inspect Vertex Weights. Blender's Vertex Weights documentation confirms that this panel lists every group and weight on the active vertex.
-
Match group names to deform bones
Look for a group whose bone has no reason to own that location: a foot on the back, a wing digit on the torso, or a tail tip on the hip. The Armature modifier documentation explains how same-named bone groups drive vertex deformation.
-
Prove the candidate on a copy
Temporarily remove that group from the one vertex and repeat the pose. If the bad motion stops, inspect the surrounding vertices for the same unrelated group before making the real edit.
Name the wrong bone and the smallest set of vertices it should not own. Do not start with a whole-rig painting tool.
Let the analyzer narrow the search
The free SkinSmart beta looks for suspicious distant or detached influences on organic armature-driven meshes. A finding names the candidate bone, explains the measurement that triggered it, shows a heatmap, and selects the affected vertices for inspection.
It does not repaint, normalize, remove, or repair any weights. Diagnostic flags can be false positives, so compare each result with the intended animation poses before changing the file.
Download the free analyzerRemove only the wrong membership
Keep the revealing pose visible. In Edit Mode, select the connected patch that moves incorrectly. In Object Data Properties, make the offending vertex group active and press Remove. Blender's Vertex Groups reference describes Remove as deleting the selected vertices' values from that group.
Do not delete the whole vertex group unless the corresponding bone should deform nothing anywhere. A foot group can be correct on the foot and wrong on the belly at the same time.
After removal, inspect the selected vertices again:
- If their remaining deform weights already sum to one, pose-test immediately.
- If the sum is low because you removed a meaningful weight, use Normalize All on the selected region. Normalization rescales the remaining proportions; it does not decide which bones belong there.
- If the vertices now have no useful deform weight, assign them to the anatomically correct nearby group before normalizing.
Why broad fixes spread the damage
Smooth
Smoothing averages a group's weights across connected neighbors. That can widen an unrelated influence into healthy vertices. Remove the wrong membership first; smooth only a deliberately selected boundary if the result needs it.
Normalize All
Normalization makes the selected deform weights add up consistently. A wrong bone at 0.20 remains a wrong bone after the row is rescaled. Normalize after the membership is correct, not as a substitute for diagnosis.
Parent with Automatic Weights again
A whole-mesh rebind replaces far more information than this failure requires. It may erase good hand-tuned transitions elsewhere while producing new proximity errors on close limbs, wings, tails, or layered surfaces.
What the diagnostic result means
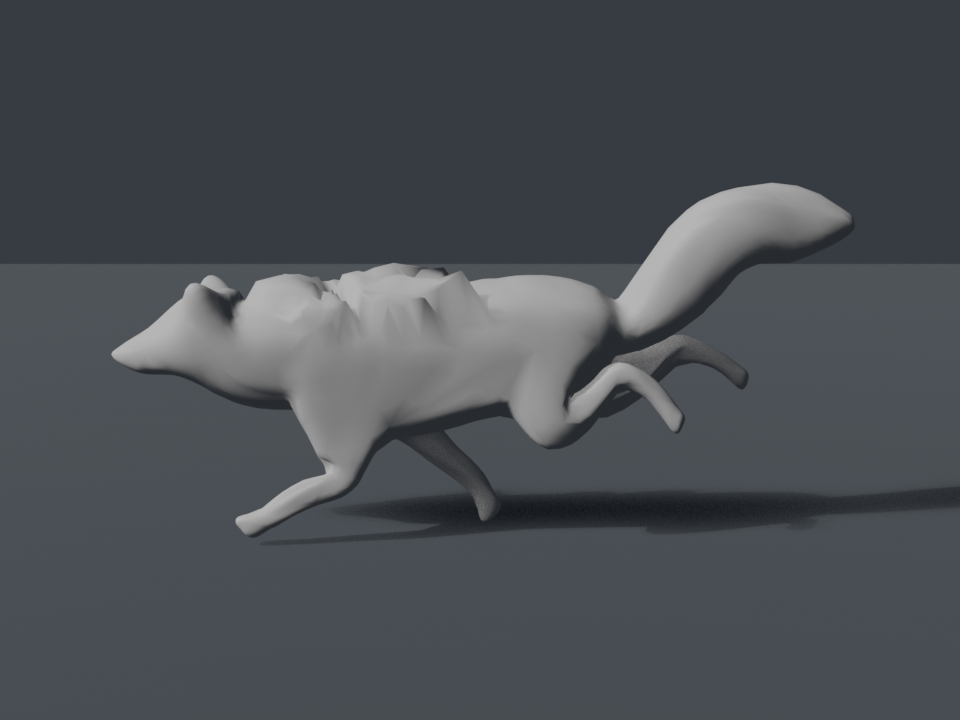
The pictured fox uses a deliberately injected b_RightFoot02_022 influence across 34 upper-back vertices. SkinSmart ranks that distant influence, names the bone, paints the affected region, and selects the vertices. The correction shown in SkinSmart's demo was performed manually.
This fixture proves that the analyzer can surface this known failure class. It does not prove that every flag on an arbitrary production rig is wrong. A locally plausible weight can still violate an artist's intended silhouette, and an unusual creature can have valid distant relationships that look suspicious to a geometric detector.
If no unrelated group appears on the bad vertex, do not force a bleed diagnosis. Inspect the neighboring parent-child groups, bone envelopes, topology, constraints, shape keys, and modifier stack instead.
Retest the complete motion
- Rotate the bone through its full useful range, not only the pose where you noticed the error.
- Move the parent bone too; a child fix can expose a transition problem higher in the chain.
- Inspect the edge of the edited patch for a new crease or stationary vertex.
- Check mirrored limbs independently unless both the mesh and bone naming are genuinely symmetric.
- Keep the saved copy until the full animation still behaves correctly.
Blender references
- Armature Modifier: how same-named bone groups drive vertex deformation.
- Vertex Weights: how to inspect every influence on one active vertex.
- Vertex Groups: how Assign, Remove, Select, and weight normalization operate.
- Editing Weight Paint: what Blender's Normalize, Clean, Smooth, and Limit Total tools actually change.